
")
Even the most experienced dentists have a hard time achieving inferior alveolar nerve (IAN) anesthesia 100% of the time. Although the numbers can vary with every study, it’s reported that IAN anesthesia failure can be as high as 48%. Nothing can put fear in your soul like when a patient jumps up when you’re 30 seconds into drilling a lower molar.
Fear not. Over the next three days, we will methodically go through everything you need to know in order to troubleshoot your failed IAN block.
Today we start with a referable guide, in order to first figure out what went wrong.
Anatomy
| The Goal To bathe the IAN in enough anesthetic solution that you cover at least 3 nodes of Ranvier (around 5mm of space).This deposition has to be done 5 mm above the lingula of the ramus of the mandible, as the IAN enters the lingula. How To Achieve The Goal Approximate this point of potential deposition by: 1. Determine the anterior and posterior border of the ramus. 2. Determine the flare of the ramus to the left and right side of the patient. 3. The point of deposition is 1-1.5 cm above the mandibular occlusal plane. 4. The point of deposition is about half way between the anterior and on posterior border of the ramus. What Went Wrong?The most common cause of IAN block failure is injecting too low, therefore missing the nerve, as you inject below the level of the lingula.The second most common cause of failure is injecting too medially, anterior to lingula. What To Do: Use a higher injection point (1.5-2 cm) above the mandibular occlusal plane, closer to the mandibular notch. *Note: Resist the temptation to do a long buccal block or an infiltration, when your initial IAN block attempt didn’t work. This just obscures the signs of successful pulpal anesthesia, and rarely results in adequate operative anesthesia. |
Infection
Infection or pre-operative pain has been proven to cause anesthesia failure, both on the maxilla and the mandible.
What To do:
- Prescribe pre-operative antibiotics.
- If the treatment is urgent, sedation or general anesthesia should be considered.
Anxiety
Anxious patients have been shown to present with higher perceived pre-operative pain and more perceived discomfort during dental procedures. This anxiety is heightened when a patient reports a difficult time “getting frozen” previously.
What To Do:
- Examine the patient’s treatment history for any past indications of the methods of anesthesia that worked.
- Test, test and test pulpal anesthesia with endo-ice or electric pulp testing prior to treatment. This significantly helps with lowering anxiety, as you and the patient are both now sure that pulpal anesthesia has been achieved.
Needle Gauge
30 gauge needles or smaller have been shown to deflect more during injection. This leads to depositing the anesthetic solution somewhere other than the intended target. Also, 99% of broken needles are 30 gauge needles.
Some dentists believe that using smaller gauge needles leads to less discomfort for the patient during injection. This has not been shown to be true in the literature.
What To Do:
Use 27 or 25 gauge needles.
Local Anesthetic Agent
- There is no significant advantage of one local anesthesia over the other, when it comes to IAN blocks.
- Although, 4% articaine has been shown to increase the risk of neurotoxicity and parasthesia when used for mandibular injections.
Time
- Slower injection speeds has been shown to increase success rates of IAN blocks. 2 ml injection volume per minute is an ideal speed – for patient comfort and improving success of the block
- Complete IAN anesthesia can take up to 20-30 minutes. If the patient is not numb in the first 5 minutes, you should wait another 10 minutes. Following this, repeat tests for checking pulpal anesthesia (endo-ice, electric pulp testing).
So you’ve tried the tradition method of an IAN block. All of the soft tissue signs of anesthesia (lip, tongue and gingiva numbness) were there. However, you didn’t achieve pulpal anesthesia. How do you know? Well, most likely the patient jumped out the chair as you were drilling.
You’e now settled (hopefully) from your panic attack. What do you do now?
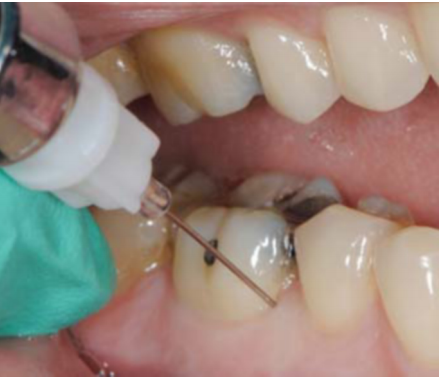
Periodontal Ligament (PDL) Injection
This technique is a great single tooth remedy for the failed IAN block. For periodontal, restorative and oral surgery procedures, success rates of anesthesia are reported to be 88% -100%. However, when treating a tooth with severe pulpitis, success rates can drop to 58%.
Injection Protocol
- Provide pre-anesthesia, for patient comfort, if anesthesia is not already in effect around the tooth in question. This is simply a buccal infiltration technique, depositing ¼ to ½ of a carpule of the selected agent.
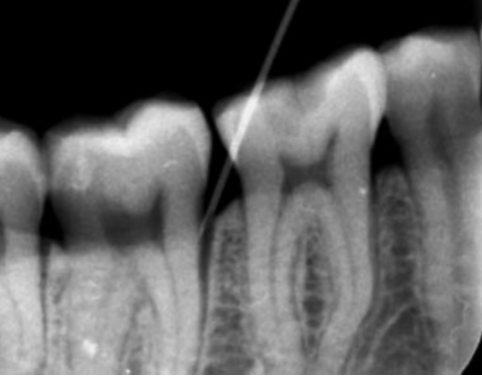
- Using a 27-gauge short needle, put the bevel of the needle towards the root.
- Insert the needle into the sulcus using periodontal probing angles until the tip is engaged against the periodontal ligament and bone.
- Maintain firm, steady pressure while slowly administering anesthetic; blanching is expected in the attached and marginal gingiva.
- Once blanching is seen with no observed backflow, start depositing. Make sure the depth of penetration remains constant throughout the injection.
- Deposit 0.2 ml (about one stopper) over a full 20 seconds.
- Once 0.2 ml is injected, move to the next site.
- Continue injection around the tooth near all the line angles (MB,DB,ML,DL), making sure you see blanching before you move to next site.
The cardinal sign of a successful PDL injection is tissue blanching. If blanching doesn’t happen, try a deeper penetration first, and if the second attempt is unsuccessful – move on to the next site on the tooth.
*Note: The PDL technique is not recommended on primary teeth with a permanent tooth underneath, due to potential hypoplastic trauma to the forming permanent tooth.
Gow-Gates Technique
This technique of anesthesia has been shown to have an incredible success of 97.25%. This rate drops to around 52% when dealing with a tooth with severe pulpitis. However, at the same time, more than half of all American dentists report never using the method after graduating dental school.
Injection Protocol
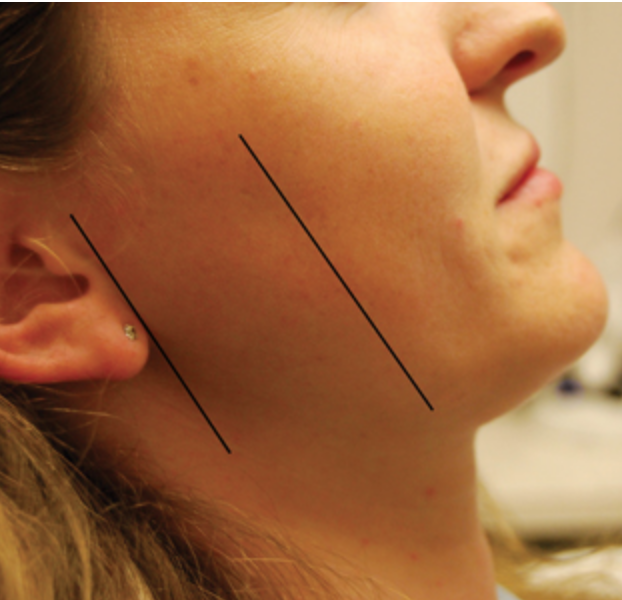
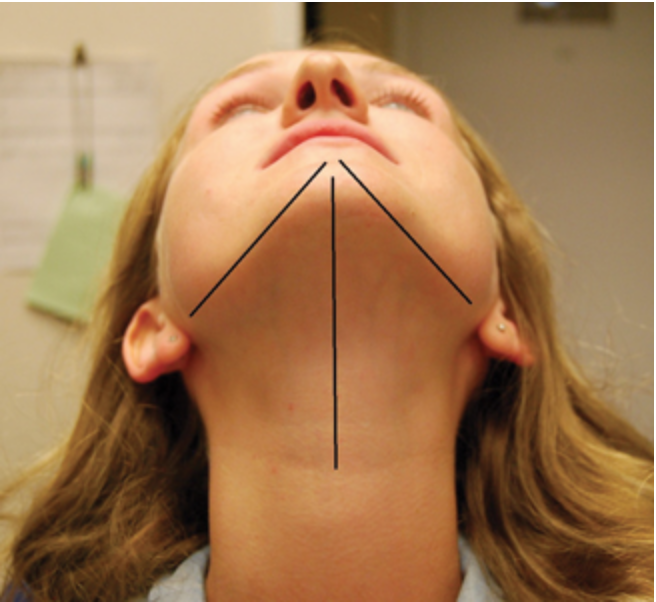
- Ask your patient to open and close a few times, and extraorally observe and palpate the head of the condyle as it bulges out of the articular eminence of the temporal bone.
- After palpating the bulging condylar head, slide your index finger below and to the back of the head of the condyle.
- With you finger still behind the condyle, ask you patient to open wide, and with your thumb palpate the anterior border of the ramus, slightly above the depth of the coronoid notch.
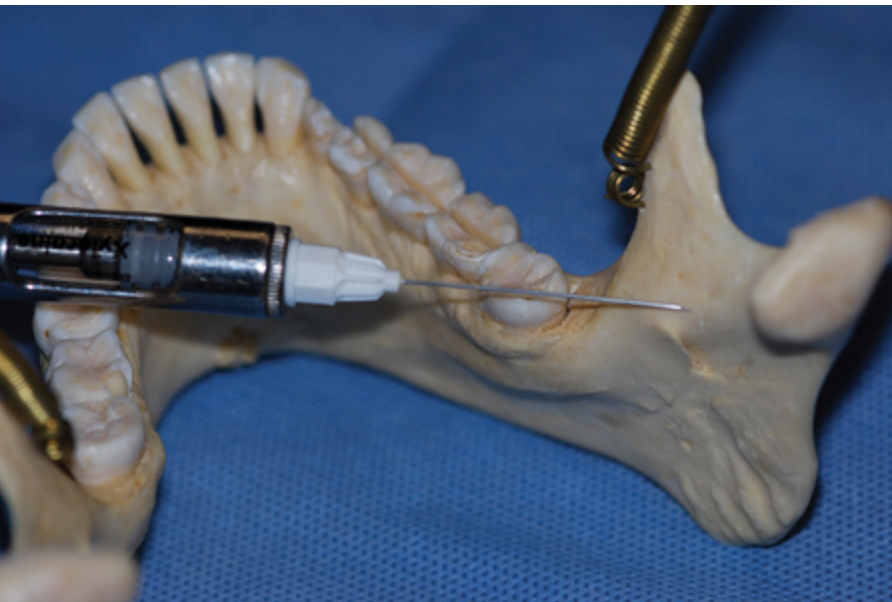
- The target for your needle is directly towards your index finger (positioned extraorally, behind the head of the condyle). Another way to visualize this is just below the occlusal plane and distal to the second maxillary molar.
- While aiming for your finger, you will hit bone with your needle, and therefore you start depositing anesthesia.

The high success rate of this method is mainly because we are targeting all mandibular branches of the trigeminal nerve with a single injection. This technique also has a very low chance of complications such as hematoma, trismus or nerve injury. Even positive aspirations are about 2%, because this area of the mandible is relatively avascular. Nerve injury is also rare because the needle is about 20 mm lateral to V3, so there is no contact with this large neurovascular bundle.